Brushes
Working with sprites and brushes
Sprites and images
The game has two categories of images: sprites and regular .png files.
Sprites are the images the game uses for entities and objects, such as units, tiles, objects on tiles.
Regular .png files are used for UI elements - items in the inventory, perk icons, the look of the menus. They can be found under gfx/ui/, gfx/skills/.
Some game objects have both a sprite and a regular .png. For example, a weapon will have a sprite that's used on the character model and during combat, and multiple icons to be used in the inventory.
Sprites, spritesheets and brushes
Sprites get organised into sprite sheets, which are large images containing a whole lot of individual sprites. In the basegame data folder, they can be found under gfx/, for example gfx/entity_0.png.
Each sprite sheet has a corresponding brush file, which describes to the game where to find the images on the sprite sheets. They can be found under brushes/, for example entity_0.brush.
With Adam's modkit, it is possible for us to extract the sprites and sprite definitions from the sprite sheets and brush files, using bbrusher.exe. This was done by reverse-engineering the brush files, so some of the parameters are guesswork.
Using bbbuilder, bbrusher is automatically called for both extracting and re-combining brushes/spritesheets, so I'll be focusing on that.
Practical example
This zip contains an example mod used in this tutorial. You can use bbbuilder extract mod_sprite_example.zip to get the contents.
We have created a custom dagger, found in scripts/items/weapons/my_dagger.nut.
Apart from the filename and first line, three lines were changed:
this.m.IconLarge = "weapons/melee/icon_my_dagger.png"; and this.m.Icon = "weapons/melee/icon_my_dagger_70x70.png"
These are the 'regular .png' UI icons, used for things like the stash icon and tooltips.
The corresponding images can be found under gfx/ui/items/weapons/melee/.
this.m.ArmamentIcon = "icon_my_dagger";
This is the ID of the item in the sprite sheet. We will get to this.
The mod has one brush file, brushes/mod_sprite_example_my_spritesheet.brush, and one spritesheet, gfx/mod_sprite_example_my_spritesheet.png.
These files are not created by hand - they are created by bbrusher during the packing process.
While extracting the mod, bbrusher will use the definitions in the .brush file and the images in the spritesheet file to extract the definitions and images.
The extracted brushes / sprites will be put into the unpacked_brushes folder. Each spritesheet will have their own sub-folder.
In this case, we only have one brush, and this will be sufficient for most mods. Larger mods might organise their sprite sheets into multiple brushes and thus sub-folders. For example, Stronghold currently has:
unpacked_brushes/
	stronghold_tactical/
		metadata.xml
		icons
	stronghold_worldmap/
		metadata.xml
		icons
Back to the example: opening unpacked_brushes/mod_sprite_example_my_spritesheet, we see two files: metadata.xml and icons/icon_my_dagger.png.
metadata.xml contains the information on how to create the brush file. This is what we will be editing to add or remove sprites or change their position and layout.
	<brush name="gfx/mod_sprite_example_my_spritesheet.png" version="17">
	  <sprite id="icon_my_dagger" img="icons/icon_my_dagger.png"  width="104" height="142"  left="2" right="40" top="-55" bottom="-5" offsetY="35" ic="FF74797D"/>
	</brush>
Each metadata file first defines the name of the spritesheet with brush name="gfx/mod_sprite_example_my_spritesheet.png". For bbbuilder, this MUST match up with the name of the folder it's contained in, otherwise there will be issues later.
The version parameter is a constant, just copy it.
Then, we define one sprite in this file: our cool custom knife with a wicked bloody edge. The attributes are:
- id="icon_my_dagger"
This is the identifier the game will use to refer to the sprite. Note the lack of .png. If we look in the basegame dagger.nut, here's how it's used:this.m.ArmamentIcon = "icon_dagger_01";. - img="icons/icon_my_dagger.png"
This tells bbrusher what image corresponds to this file, to pack into the spritesheet. Indeed, we can find icon_my_dagger in the icons/ folder. - width="104" height="142"
These are functionally useless as far as I know. We will define the width and heights later. You can delete them. - left="2" right="40" top="-55" bottom="-5":
These are the "cardinals", describing the size and position of the image. They are essentially offsets from the center point of the canvas. Positive values mean "To the right" for the horizontal values (left, right), and "upwards" for the vertical values(top, bottom).
The combination of left/right and top/bottom also describe the width and height of the image.
In this case, we have:
- "left="2" right="40":
The sprite spans from two pixels to the right of the center line up to 40 pixels to the right of the center line, and is a total of 38 (40-2) pixels wide. - "top="-55" bottom="-5" -> The sprite spans from 55 pixels below the center line up to 5 pixels below the center line (negative value -> downwards), and is a total of 50 (-55 - -5 == 55 - 5) pixels tall.
To visualise this, we can use the paperdoll website: https://msuteam.github.io/paperdoll/
Load in the "full body" template on the left. Then, drag the dagger icon from the folder into the middle. It will look like this:
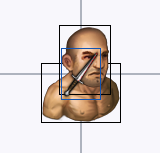
Clearly, this doesn't look right. We can insert the cardinals into the top left input field ("paste cardinals"):
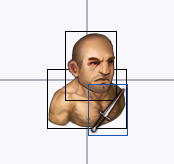
Now the dagger is correctly positioned.
If we don't specify these values, the game will place the sprite smack in the center and use its dimensions from the icon for size.
- offsetY="35"
We talked about the "center point" of the sprites in an 'image' in the last point. For most images of the game, this is the center of the 'bounding box', for example the paperdoll of the unit in the character screen, in the turn sequence bar...
The exceptions are the units on the battlefield and worldmap. Here, the center point is the tile at the bottom. This image shows the difference, where X marks the center point:
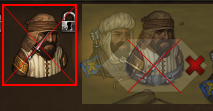
This means that, using the usual cardinals we defined before, everything would be squished onto the ground. We need to offset the image to the top. This is done with offsetY="35".
The game mostly uses a few standard offsets. For example, if it's a humanoid on a tile, it'll use offsetY="35" for its sprites. In general, you'll want to look at similar vanilla images and copy those. - ic="FF74797D" (and other values like b1, b2...)
These are a bit mysterious. Some probably define layering, alpha... Generally just copy them from another, similar sprite.
Practical tips
- Use bbbuilder - It takes away some of the pain point, like forgetting to repack the brush files after you've changed something
- Use paperdoll to position and size your sprites, then copy the cardinals to your metadata file. Take the offsets (X/Y) from a related vanilla metadata.xml.
- Don't confuse the "id" and "img" values -
img(img="icons/icon_my_dagger.png") points towards the .png version of the image on the harddisk, and is used to pack it into the spritesheet.idis the reference to that sprite in-game,this.m.ArmamentIconin our example. - Don't forget about the UI icons (gfx/ui/items...)